
getting started
Get your first machine monitored in under 5 minutes.
step 1: create an account
- Go to owlette.app
- Click Register and create an account with email/password or Google sign-in
- Set up two-factor authentication. It's required, and either option satisfies it on its own:
- a passkey (Windows Hello, Touch ID, Face ID, a security key, or a password manager like 1Password) signs you in and clears 2FA in one step, with no code to type
- an authenticator app gives you 6-digit codes — these run on desktop as well as mobile, so you don't need a phone
- Save the backup codes you're shown at the end — they're how you get back in if you lose the device
step 2: create a site
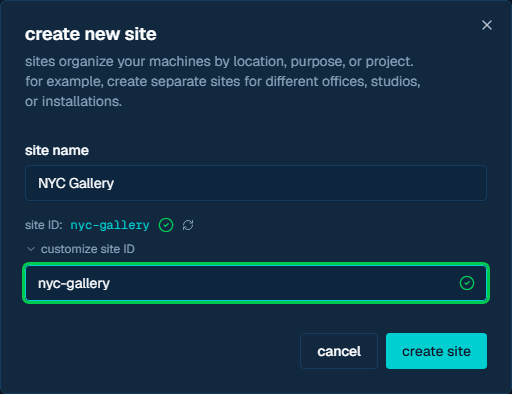
Sites organize your machines — think of them as locations, departments, or projects.
- Click "new site" in the dashboard (or "Create Your First Site" from the empty state)
- Enter a site name (e.g., "NYC Gallery", "Main Office")
- The site ID is auto-generated from the name — expand "customize site ID" only if you want to set a specific ID
- The site timezone is detected from your browser — expand "change timezone" if the site lives somewhere else. Process schedules at this site run on this clock; see timezones
- Click "create site"
step 3: install the agent
download
The dashboard header has two installer buttons side by side — pick the one that matches where you are:
- download — if you're already working on the machine you want to monitor, click this to download the latest installer directly.
- copy link — if you're remoting into the machine, click this to copy the installer link, then paste it into a browser on that machine to download it there — no file transfer needed.

install & connect
- Run the installer as Administrator on your target machine
- Follow the setup wizard
- The owlette window opens on join a site, showing a pairing phrase (3 random words), the authorization link, and which owlette server it belongs to
- Click open owlette.app/add in that window to authorize from this machine, then select a site and click "Authorize"
- Or authorize from a phone or another computer by opening the displayed URL and entering the pairing phrase
- The agent receives credentials and connects — done
Bulk deployment
For deploying to many machines, use the /ADD= flag with a pre-authorized phrase from the dashboard. See Installation → Silent Install.
step 4: verify
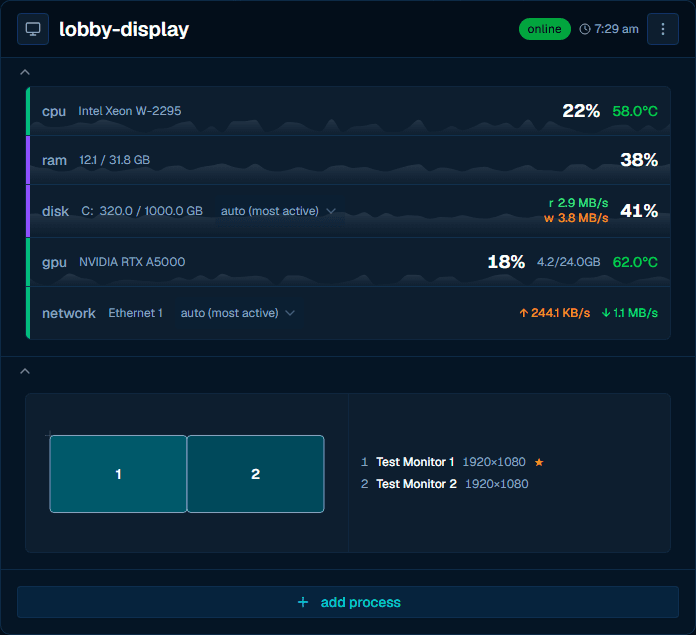
Within 30 seconds of installation, your machine should appear in the dashboard:
| check | what to look for |
|---|---|
| Machine visible | Machine card appears in your site with a green "Online" indicator |
| Metrics flowing | CPU, memory, disk percentages updating |
| System tray | Owl icon visible in the Windows notification area |
step 5: add processes to monitor
Now that your machine is connected, tell owlette which applications to watch:
- Click on your machine in the dashboard
- Click "add process"
- Give it a name (e.g., "TouchDesigner")
- Set launch mode to always on — owlette starts the process and relaunches it if it crashes. Choose scheduled instead to run it only inside time windows you define; the gear at the end of the control opens the schedule editor in any mode.
- Enter the executable path (e.g.,
C:\Program Files\Derivative\TouchDesigner\bin\TouchDesigner.exe) - Click "create process"
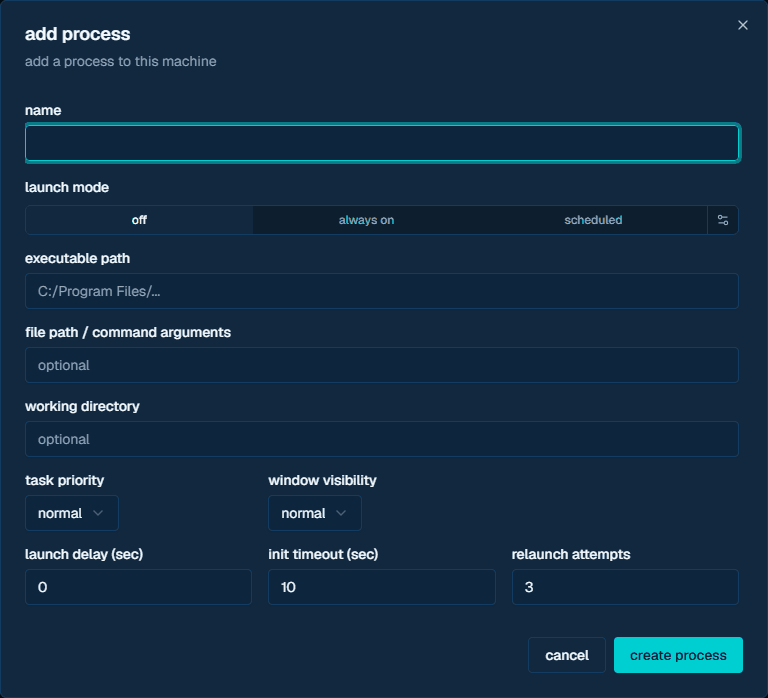
The agent immediately begins monitoring the process. If it crashes, owlette restarts it within 10 seconds.
what's next?
You're up and running. Here's what else you can do:
- Configure process settings — Priority, visibility, launch delay, crash limits
- Deploy software remotely — Push installers to machines without physical access
- Sync files with roost — Publish versioned files and sync them to target machines
- Chat with your machines — Use hoot to query and control machines via natural language
- Set up email alerts — Get notified when machines go offline or processes crash
- Add more machines — Scale out to your full fleet
- Invite team members — Add users with role-based site access
need help?
- Check the Troubleshooting guide for common issues
- Review Agent Troubleshooting for agent-specific problems
- Open an issue on GitHub
- Email us at support@tridant.io
docs
start here for owlette setup, api, cli, sdks, and release notes.
agent
The owlette agent is a Python Windows service that runs in the background, monitoring your processes, collecting system metrics, and syncing everything to the cloud. It's the core of the owlette system — every machine you want to manage needs an agent installed.